Niet gecategoriseerd

The Truth About Your Coffee Cup

The Truth About Your Coffee Cup

Coffee on the run has seem to become the social norm in the last few years with some cafes and even coffee houses catering only to takeaway customers. We know there is a direct effect on the environment from the increase in waste but did you know there is a direct effect on your health?

The Facts

As many as 4 billion coffee cups are used each year in the Netherlands generating over 280,000kgs of waste and the sad truth is, despite what people think, they aren’t recyclable (1).

Coffee cups are lined with a film of polyethylene (the same stuff used to make plastic bags and plastic water bottles). This plastic lining prevents the coffee leaking through the paper cup. It’s this lining that deems them unfit for the recycling process. To top it off, this polyethylene releases methane gas when sent to landfill, a greenhouse gas 21 times the global warming potential of carbon dioxide (1).

But what about the biodegradable or compostable ones?

Whilst it’s a step in the right direction, these cups require commercial composting systems to break them down.
The term ‘biodegradable’ coffee cup is also misleading, as the theory behind this process is yet to be scientifically proven (3).

But I only have one per day?

Just 1 cup of take-away coffee per day = 365 cups per year. If you’re a fan of the long black, that’s 730 coffee cups per year as they give you two for “insulation”. YIKES.

I’ll admit that when I sat down and did the math, I was completely taken aback. Was it really worth creating all this environmental damage for a very short, insignificant 10 minutes (the amount of time it takes to drink a coffee)?

What is the effect on your health?

We want to avoid using plastic all together but the big no no is using plastic when it’s heated, think of that water bottle left in the sun when exercising, putting hot leftovers into a plastic contained and you guessed it… pouring a steaming hot coffee into a coffee cup lined with plastic (4).

What can you do?

SLOW DOWN – One of the problems with the modern world (and our digestion) is that we don’t focus on the food when we consume it. As a result, our body CANNOT prepare digestion accordingly, the mind continues racing and we only put MORE stress on our system with food or drink coming in and our digestion being caught off guard. The solution? Take 10 minutes of your day and grant yourself permission to sit down at your local café, sip your coffee in a coffee mug, and watch the world go by. Now, before you tell me you don’t have time, start small, do this 2 times a week (that’s 2 x 52) saving 110 coffee cups (or 220 coffee cups for long black drinkers) per year – sounds worth it right.

BUY A RE-USABLE CUP – These are an incredible way to reduce your impact on the environment and avoid the plastic nasties.

Some of the ones we recommend are:

Neon Kactus

Kinto

Keep Cup

For the tea drinkers:

Solecup


References

1.University of Queensland, ‘Coffee Cups’. Available here.https://sustainability.uq.edu.au/

2.Musgrave, D & Winder, C 2013, ‘Should We Avoid Eating Hot Food from Plastic Bowls and Dishes’, ABC Health & Wellbeing. Available here.

3.Whyte, S 2015, ‘Takeaway coffee cups piling up in landfill as Australia’s caffeine habit soars’, ABC. Available here

4. Hananeh WM, Al Rukibat R, Jaradat S, Borhan Al-Zghoul M. Exposure assessment of bisphenol A by drinking coffee from plastic cups. Rocz Panstw Zakl Hig. 2021;72(1):49-53. doi: 10.32394/rpzh.2021.0146. PMID: 33882786. Available here.

The Truth About Your Coffee Cup Read More »

How to go shopping for food

How to go shopping for food

 Whilst I’m a huge advocate for eating real foods (AKA foods without labels), I know that there is always going to be times where we are going to opt for food with labels.
To help overcome this hurdle with confidence, below is a list of tips and tricks that will help you skip the nasties found in packaged foods and ensure you return home with some nutritious and delicious ingredients for your next meal. You could even commit to following this guide and clean out your pantry on a rainy weekend. Trust me, you’ll be surprised what you’ll find!

#1 READ THE INGREDIENTS

Yes you read correctly, skip the nutrition panel! The list of ingredients will tell you more than enough information about what you are about to consume. If the ingredients list contains anything that you can’t pronounce (except quinoa, acai and cacao or if you are an expat new to the Dutch language ), any laboratory numbers (311, 142, 209 etc.), contains flavours, preservatives, sounds chemically or is incredibly lengthy (2-3 lines +), step away – it’s not real food and it’s most definitely not worth it.

#2 BEWARE OF TICKS OF APPROVAL

Ticks of approval are given to products where they have studied the nutritional label, they don’t take into consideration the ingredients or the processing methods. This means any of the above (in Rule #1), can be included without their consideration.

#3 BEWARE OF LOW FAT AND LOW SUGAR CLAIMS

In most cases, foods that are low fat or contain low/no sugar have been chemically modified and these are in no way good for your health (despite what the shiny labels might tell you). Ditch the plastic and eat a banana instead.

#4 BEWARE OF GREEN WASHING

Natural foods are flying off shelves; it’s little wonder the label is everywhere. The FDA hasn’t defined natural and doesn’t regulate its use, so companies can—and do—use it however they like to increase sales. All natural foods are fruits and vegetables and not one of them come with an all natural label – use common sense.

#5 ORGANIC OR CERTIFIED ORGANIC?

If a label claims to be organic, ensure it is certified organic. That means this sign below:


#6 JUST BECAUSE IT’S GLUTEN FREE OR WHATEVER BUZZ WORD-FREE, DOESN’T MEAN IT’S HEALTHY

“Gluten-Free” is the new buzz word and many companies are marketing their products as ‘gluten-free’ and hence, in the eye of some consumers, a healthier, “guilt free” alternative. Like the “fat free” movement that stripped the goodness from so many healthy foods like that of avocados, nuts, seeds and eggs and replaced it with fat-free yoghurt that contained three times the sugar, gluten free processed food is not a healthier alternative. Whether it is a store bought “gluten-free” triple chocolate brownie with macadamia and chocolate fudge icing or a “gluten free” processed rice cracker covered in artificial colours, flavours and preservatives, neither of these are a healthier alternative just because they contain no gluten. These products often contain soy flours, soybean oil, canola oil, hydrogenated vegetable proteins which are extremely damaging to your health. Same for sugar-free, superfoods, all-natural, vegan, vegetarian, made with real fruit, GMO-free, cage-free etc. Keep it simple, JUST EAT REAL FOOD, fruits, vegetables, seeds, nuts, grass-fed meats, pasture-fed eggs, wild-caught fish… are all 100% gluten free, naturally.

# 7 LOW FAT MEANS LOADED WITH SUGAR

“Low fat” labels require that the fat of the original product must be reduced 25%, but that doesn’t stop the manufacturer from adding taste with more sugar. Low fat yoghurts are the biggest culprits and have been known to contain 3 times the sugar of 100% organic full-fat alternatives. Sugar makes us fat, always opt for the full-fat organic varieties with NO added sugar or sweeteners.
To illustrate my point, a small snack size tub of yoghurt labelled “99% fat free with 40% of your RDI of calcium and enriched with vitamin D for strong bones” contains a whopping 22.8grams of sugar (equivalent to just shy of 6 tsp). Skip it, it won’t keep you satisfied and will only make you reach for another sugar fix an hour later.


#8 DON’T BLINDLY TRUST THE BRAND NAME

A well known “reliable” brand was had some controversy with a packet of dried dates. The well known brand had exactly the same ingredients: dates and palm oil, as other brands that weren’t marketed to be the “healthy” brand.
Be wary of your choices and make sure you are making the right choice, especially if they are making you pay for it.

#9 WHOLE-WHEAT DOESN’T MEAN WHOLE GRAIN

While I am not a huge advocate of grains, I needed to cover this one for all those grain lovers out there. A label of “whole wheat” doesn’t mean that only whole grains are in the product. It means that some whole grains are in it. You could have 90% white flour, and 10% whole wheat flour, and call it “whole wheat”. Cereal companies (never eat cereal by the way. If you want to know why, flip over to the nutrition label and see how much sugar is in it) and bread manufacturers are guilty of this one. If you are set on buying grains, opt for “100% organic non GMO whole grain.”

Food manufactures use an array of clever marketing strategies in an attempt to convince consumers that their new and improved products are “better for you”, when they are really just “less awful for you.” This skews our perception of what it really means to be healthy and as such, our relationship with our food and eventually our perception of well being, spirals out of control and we end up in a world of doubt, depression and frustration. Sound familiar? Want my best advice? You need to get food educated…

#10 SUGAR FREE USUALLY MEANS DANGEROUS ARTIFICIAL ADDITIVES

Products claiming to be low in sugar or sugar-free are usually artificially sweetened with products containing aspartame. Aspartame, like MSG, is an excitotoxin. It is comprised of methanol, phenylalanine and aspartic acid. Aspartame can be found in diet sodas and most other diet products however, research indicates that the sweetener increases your hunger and can actually work against your weight loss. Aspartame has also been linked to cancer, birth defects, vision problems, brain seizures and diabetes. Skip the sugar-free sweetness kick and grab an apple instead.
for your content.

#11 BEWARE OF GREEN PACKAGING

According to research green is a found-in-nature color, so we associate it with health, even when we shouldn’t. One study in the journal Health Communication found that consumers are more likely to think a snack bar with a green label is healthier than those with white or red labels–even if they are identical in every other way. If you are buying packaged foods, read the list of ingredients, don’t be tempted by the colour of the packaging, green does not necessarily mean healthy.


#12 MADE WITH ORGANIC INGREDIENTS

The “Made With Organic Ingredients” label means the food must be made with at least 70 percent organic ingredients, three of which must be listed on the package. The remaining 30 percent can be anything the production team decide and may include harsh chemicals or additives you thought you were avoiding, this is especially the case with beauty products, be wary. Again, why we say to read the ingredient list first.

#13 MADE WITH “ADDED VITAMINS”

Designed to make us think this form of processed food comes with all the benefits of fruits and veggies, this label is prevalent in the cereal (again, don’t eat cereal, you’ll get more nutition eating the cardbox box that the cereal is packaged in rather than the ceral itself), bread and snack aisles of the supermarket. Vitamins A, C, E and the Bs are added to cereal, breads and lunchbox snacks. The truth? Science shows that separating vitamins and minerals from one food and putting them in another doesn’t offer the same disease-fighting benefits. More often than not these added vitamins are synthetic forms and are nowhere near as beneficial to your health. Get your vitamins, minerals and antioxidants from real, whole foods, like veggies, fruits, whole grains and lean meats.


#14 BEST BEFORE 2026?

If the product you have purchased has a shelf life longer than you have owned your mobile phone, ditch it. We eat foods to gain life, to replenish our cells, muscles and organs to help us thrive. Food that nourishes our body is a perishable item i.e. strawberries last 4-5 days, broccoli lasts 10-12 days, beef best before 3-5 days, some biscuits on shelves today expire in November 2026… Foods lasting longer than your i-phones operating software system upgrade aren’t real foods and you will get no benefit from them. Eat to nourish your body and ditch the cardboard.

#15 BAKED NOT FRIED

Most consumers associate the word “baked” with “healthy”. This would certainly be true in home cooking: a baked potato, for example, would be a more nourishing choice than a fried potato however, this is not necessarily the case for foods found on the supermarket shelves. These goods are often baked in highly processed vegetable oils that still damage our health, check your list of ingredients.

#16 IF YOU CAN’T PRONOUNCE THE INGREDIENTS, DON’T EAT THEM.

If you flip over the package of any processed food and can’t pronounce some of the items listed in the ingredients list, don’t eat them. They are artificial in every way shape and form and will only cause your body to struggle. Those learning Dutch and unable to pronounce the words are

exempt 

How to go shopping for food Read More »

Eat Well – Move Well – Think Well

Eat Well – Move Well – Think Well Exercise, Vitamin D, and Omega-3 – The Perfect Triune for Optimising Immune Function (parents of daycare children returning after holidays), flu and COVID.

QUOTE BOARD

“Conclusions: Adults with high and moderate physical activity levels had significantly better outcomes than those with low activity when contracting COVID-19. The apparent protective effects of regular physical activity extended to those with concomitant chronic medical conditions.”

“The biological mechanisms underlying how physical activity reduces colon cancer risk have mainly been attributed to decreased adiposity and associated reductions in circulating insulin and pro-inflammatory cytokines.”

“Therefore, the use of EPA and DHA [omega-3 fatty acids] supplementation should be considered as both a supportive therapy and a prevention strategy in SARS-Cov-2 infection.”

WHAT YOU NEED TO KNOW

The evidence for the safety and effectiveness of regular exercise and supplementation with Vitamin D and Omega-3 Fatty Acids is irrefutable and unequivocal. This should be universally recommended and if it had been during the pandemic along with other preventative health advice would have had a major impact.

Exercising and supplementing a clean Omega 3 and Vitamin D (a healthy body and strong immune system) represents the most evidence-based, effective and cost-effective ways to reduce risk of both infection and serious outcomes from COVID-19 and flu.

WHAT YOU NEED TO DO

Sadly, the fact is that sick, overweight, malnourished and unfit people are the ones who are likely to get seriously ill from COVID, flu and other opportunistic infections. They are also the ones who are suffering from all kinds of other chronic health problems that lead to hospitalisation and early death.

Let’s protect ourselves and those we love from preventable illness this autumn. Now is the time to prepare ourselves.

You need to exercise every day, you need to ensure sufficient intake of Vitamin D and Omega-3 fatty acids, you need to eat a healthy diet and you need to have healthy attitudes, emotions and social interactions.

Our recommendations for a quality source of Omega 3 is Arctic blue visolie/algae oil as we know the oils have been tested for heavy metals. Very important to check with any omega 3 you are supplementing. Have a shop around online to find the best deal but for reference it looks like this.

For vitamin D we recommend Biotics Vitamin D-mulsion forte. Looks like this.

Reference:

Szabo, Z et al. (2020) The Potential Beneficial Effect of EPA and DHA Supplementation Managing Cytokine Storm in Coronavirus Disease. Frontiers in Physiology 11: Article 752

Gibbons et al. (2022) Association between vitamin D supplementation and COVID-19 infection and mortality. Nature – Scientific Reports 12:19397

Steenkamp et al. (2022) Small steps, strong shield: directly measured, moderate physical activity in 65,361 adults is associated with significant protective effects from severe COVID-19 outcomes. British Journal of Sports Medicine http://dx.doi.org/10.1136/bjsports-2021-105159


Eat Well – Move Well – Think Well Read More »

Exercise Significantly Reduces Cancer Risk.

Exercise Significantly Reduces Cancer Risk

Exercise Significantly Reduces Cancer Risk

“There is strong epidemiological evidence that regular physical activity protects against colon cancer. Current estimates suggest that achieving the highest vs lowest level of physical activity reduces the relative risk of developing colon cancer by 12% to 28%. Physical activity after a colon cancer diagnosis is also associated with a decreased risk of cancer-specific mortality and recurrence.”

“The biological mechanisms underlying how physical activity reduces colon cancer risk have mainly been attributed to decreased adiposity and associated reductions in circulating insulin and proinflammatory cytokines.”

“However, the epidemiological evidence, including both observational and Mendelian randomisation studies, demonstrates that physical activity is inversely related to colon cancer risk independent of adiposity.”

“These findings suggest that the systemic responses to acute aerobic exercise inhibit colon cancer cell proliferation in vitro, and this may be driven by IL-6-induced regulation of DNA damage and repair. This mechanism of action may partly underlie epidemiological associations linking regular physical activity with reduced colon cancer risk.”

WHAT YOU NEED TO KNOW

Exercise significantly shifts human metabolism towards health and thus improves all aspects of physical and emotional health. This is because humans are genetically designed to require exercise in order to express physical and emotional health.

Exercise is, literally, an essential nutrient for humans and a deficiency of daily exercise is a primary causal factor in all chronic physical and emotional illnesses.

Exercise is an evidence-based real panacea for preventing and resolving chronic illnesses including cancer, obesity, diabetes, heart disease, immune system dysfunction, brain dysfunction, depression, digestive disorders, sexual dysfunction and virtually every other chronic illness. No drug ever has or ever will ever match the proven benefits of exercise (or healthy eating or healthy thinking).

Exercise is FREE and the only side effect of exercise is greater overall health and quality of life!

WHAT YOU NEED TO DO

If you want to get and stay well, you need to exercise every day, you need to eat a healthy diet, and you need to have healthy attitudes, emotions, and social interactions. There is simply no other way.

Reference:

Orange et al. (2022) Acute aerobic exercise-conditioned serum reduces colon cancer cell proliferation in vitro through interleukin-6-induced regulation of DNA damage. Int. J. Cancer. 2022;151(2):265–274.

Exercise Significantly Reduces Cancer Risk. Read More »

workout, ball, pilates-1931107.jpg

Exercise Erases Genetic Risk of Type 2 Diabetes: It’s Time to Stop Blaming Genes and Start Empowering Taking Responsibility for Lifestyle Choices

Exercise Erases Genetic Risk of Type 2 Diabetes

Exercise Erases Genetic Risk of Type 2 Diabetes:
It’s Time to Stop Blaming Genes and Start Empowering Taking Responsibility for Lifestyle Choices

Free Black Fixed-gear Bike Beside Wall Stock Photo

During a median follow-up of 6.8 years, there was a strong linear dose-response association between moderate-to-vigorous-intensity physical activity (MVPA) and incident T2D, even after adjusting for genetic risk. Compared with the least active participants, the HRs [hazard ratios or risk] for higher levels of MVPA were: 0.63 for 5.3–25.9 min/day, 0.41 for 26.0–68.4 min/day and 0.26 for >68.4min/day.

The association between total physical activity/MVPA and T2D was similar across genetic risk strata but the absolute risk reduction from MVPA was the largest for those with high genetic risk.

Overall, results based on the total physical activity and MVPA showed similar patterns. In both cases, high genetic risk and the highest total physical activity/ MVPA combination were associated with a lower risk of incident T2D than low genetic risk and the lowest total physical activity/ MVPA combination.

Conclusion: Participation in physical activity, particularly MVPA, should be promoted especially in those with high genetic risk of T2D. There may be no minimal or maximal threshold for the benefits. This finding can inform future guidelines development and interventions to prevent T2D.

WHAT YOU NEED TO KNOW:

This most important finding of this study is that people identified as having high genetic risk that had high levels of physical activity had lower risk of developing diabetes than people identified as having low genetic risk that had low levels of physical activity.

In other words, exercise/activity level is the variable determining if you develop diabetes NOT your genes! Exercise/activity levels determine the expression of your genes and deficient exercise/physical activity causes the genetic expression of diabetes.

Diet is also a very significant determining factor regarding whether you genetically express diabetes or not. Chronic illness is lifestyle illness NOT genetic illness. The only way to prevent or cure diabetes and other chronic illnesses is to live a healthy lifestyle that results in the genetic expression of chronic health rather than chronic illness – you need to ‘live right for your species type’!

WHAT YOU NEED TO DO:

You need to exercise every day, you need to eat a healthy diet, and you need to have healthy attitudes, emotions, and social interactions – if you want to get and stay well, you need to eat well, move well, and think well. There is simply no other way.

Reference:

Luo et al. (2022) Accelerometer-measured intensity-specific physical activity, genetic risk, and incident type 2 diabetes: a prospective cohort study. Br J Sports Med ;0:1-8:10.1136/bsports-2022-106653

Exercise Erases Genetic Risk of Type 2 Diabetes: It’s Time to Stop Blaming Genes and Start Empowering Taking Responsibility for Lifestyle Choices Read More »

Posture exercises

Posture exercises

Your posture is a window to your health

Many daily activities cause large amounts of spinal strain leading to abnormal postural change.

Postures such as sitting for long hours, using tablets and smartphones or long periods of reading are big factors, and many of these activities begin at young ages.

Good posture is not only important for your spine and preventing injuries, headaches, pain and degeneration, but the literature is clear in regards to posture and the effect on lung capacity, cognitive function, mood regulation, digestion, circulation, heart and vascular disease, stress and energy. 

In short, your posture directly influences your ability to have a healthy body that supports the life you want.

Hereby, we send you 2 exercises regarding your posture;

Pectoral stretches – 3 times

This exercise will help stretch the tight pectoral muscles in the front of the chest and bring your shoulders back and chest open. 

Why is this important? Rounded shoulders and a forward head can cause up to 30% reduction in lung capacity! Think of this next time you feel tired or have poor concentration.

1.  Stand in an open doorway. With your elbows slightly below shoulder height, place your hand and forearm on each of the door frames.

2.  Slowly lean forward until you feel a mild stretch in your chest

    Hold for 30 seconds – repeat 3 times

All Fours exercise – 3 minutes

This exercise will help strengthen the weak muscles in the spine and bring the shoulders and neck back from their forward position.

1.  Start with your arms and legs on the floor

2.  Raise one arm and the opposite leg to be horizontal

     Hold for 10 seconds – repeat with the other arm and leg

Do this exercise for 3 minutes in total, using slow and controlled movements. For the entire 3 minutes, raise your head up so that your eyes look at the wall in front of you to create the natural curve in your neck. Use a wall for support if you feel unbalanced.

If you have any questions, please get in contact with us.

Enjoy the exercises!

Posture exercises Read More »

What you need to do to prepare for the best birth (and beyond)

What you need to do to prepare for the best birth (and beyond)

WHY IS PERINEAL MASSAGE IMPORTANT?

Let’s be honest from the start, if this is your first pregnancy, then the thought of having to do perineal massage might not thrill you. Some women are tentative-and rightly so because when perineal massage is done properly, it hurts! Literature indicates the benefit of consistently massaging the perineum during late pregnancy as a birthing mother will be less likely to tear during labor. Wouldn’t you agree that encouraging your perineum not to tear is a good thing? Some women approach perineal massage half-heartedly, presuming that all will be fine. Sadly, many women are then unprepared for the likely scenario of an episiotomy during labor, because their pelvic floor and perineum will not relax and accommodate their baby. After hearing countless birthing stories, most women after birth wish that they had taken more time to prepare their bodies for labor.

NOTE TO PARTNERS: 

If it isn’t enough that women have to psych themselves up to even think of stretching perineal tissue, some mothers and midwives have informed me of their partner’s reluctance to help. All I can say is this: the scar tissue from an episiotomy could affect the remainder of a mother’s sexual life, with future intercourse being possibly painful as a result. Birthing is not women’s business-it’s family business. If a woman’s sexual pleasure is affected, so will her partner’s. So don’t be prudish or shy, work together.

Perineal stretching is also vitally important if a birthing mother has scar tissue from a previous birth. Scar tissue loses elasticity and generally remains restrictive in nature.

Factors that influence tearing:

  • The strength of your contractions.
  • The stretch ability or elasticity of your body tissue.
  • The size of your baby.
  • Position of your baby’s head
  • Your position during delivery.
  • The speed of your delivery.
  • The skill of your attendant.
  • Scarring from previous deliveries.
 

HOW DO I MASSAGE MY PERINEUM?

If you and your partner want to take a natural approach to labor, then you will have to become comfortable with looking at and touching female genitalia.

There is little room for modesty when preparing for childbirth. Watching a birth is a gilt and a humbling miracle but let’s not kid ourselves, it is certainly not glamorous.

If your partner refuses to participate or resists helping you with the massage, then this is a very clear indication that together you need to clarify your birthing preferences and objectives.

As a couple or individually you can use KY jelly, vitamin E oil or jojoba oil for massage. 

When you are performing this stretching, it is important to focus on opening up your body. Try to relax, and have confidence in your body’s ability to stretch and give birth to your baby.

When do we start? Begin perineal massage any time from 30 weeks.

How often? If perineal massage is performed correctly (it will hurt); twice a week.

Perineal massage should take 15-30 minutes.

Your mission is to stretch and massage the tissues around your vagina and perineum. To begin, wash your hands well, then lean back into a relaxed position. 

Remember, if this stretching doesn’t feel uncomfortable and hurt a little, then you are not stretching firmly enough. So be brave, take a deep breath and relax into preparing your body for a gentle and safe birth.

External Massage:

Locate the area of skin at the centre of your perineum, directly between your vagina and anus. Place your index and middle fingers of both hands opposite each other and pull your fingers out towards your thighs, dragging the skin with you. This creates tissue pull through the superficial layers of skin. 

Repeat 10-20 times.

Then turn your fingers in slightly and drag them up towards your pubic hair. Repeat 10-20 times. Then move back to the centre point of your perineum and place the tips of your thumbs opposite each other. Move one thumb up towards your vagina and the other thumb down towards your anus (this feels as delightful as a ‘Chinese burn’!).

Repeat 10-20 times.

Internal Massage:

Place two fingers inside your vagina and pull down and out slightly. Pull down firmly until you feel a good stretch. Then pull down a little bit more.

Then pull sideways firmly.

Swap hands and stretch the other side. Repeat these three directions 10-20 times.

WHY SHOULD I STRENGTHEN MY PELVIC FLOOR?

Your pelvic floor muscles are the muscles right between your legs. They make a figure of eight loop surrounding the urethral and vaginal sphincters and the anal sphincter at the rear. Unlike your uterus, these muscles are under your conscious control and need strengthening. Irrespective of your birth outcome, be that vaginal or caesarean, all pregnant women need to strengthen their pelvic floor.

A recent Norwegian study suggests that while there may be a small increased incidence of pelvic floor damage among women who deliver their babies vaginally, the major risk factors are a hurried second stage of labor, forceps delivery and epi-siotomy-not natural vaginal birth per se.

THE BENEFITS OF STRENGTHENING THESE MUSCLES DURING PREGNANCY:

• Being able to relax your pelvic floor during labor

If you practice strengthening these muscles, you will develop an awareness of where they are so that during labor vou can consciously relax this area.

To speak frankly, this will be highly useful when your midwife turns to you as your baby’s head is crown-ing, and says, “Now just let your vagina relax, let it go.” She says this just as your perineum fills with the weight of your baby’s head and you feel your body stretch to accommodate for something the size of a

frozen chicken. You will then look at her in absolute horror and confusion.

You need to strengthen these muscles in order to relax them during the crowning stage of labor.

  • Better circulation promotes better healing
    Exercising a muscle brings more blood to an area and promotes better circula-tion. Having efficient blood supply to your pelvic floor will enable these muscles to stretch easily during labor and allow for quick healing post-birth.*
  • To prevent vulval or anal varicosities (hemorrhoids) during labor
    A strong pelvic floor prevents sphincter weakness and the occurrence of subsequent hemorrhoids. The pressure on your pelvic floor during labor and the engorgement of these tissues post-labor will encourage hemorrhoids if your pelvic floor is weak.
  • Helps prevent constipation
    At some point after giving birth you will have to use your bowels. Unconsciously you may resist this urge through fear. Many mothers post-birth feel anxious that it may hurt or they may cause themselves grave injury. A weak pelvic floor encourages such fear.

ADVANTAGES OF STRENGTHENING YOUR PELVIC FLOOR POST-NATALLY:

Failing to strengthen your pelvic floor during pregnancy encourages a weakness post-labor which, over time, can be exaggerated. Complacency sets in and Pelvic floor Dysfunction (PFD) becomes a daily reality. Then as women age, they often wonder why their body feels so different.

A strong pelvic floor helps prevent the symptoms of PFD, which include:

– urinary urgency or urinary incontinence (the inability to control your bladder)

– the need to urinate frequently, a common complaint amongst women post-birth.

Urination depends on muscle coordination between the bladder and the pelvic floor muscles. These muscles are meant to relax while the bladder contracts.

However with PFD, the pelvic floor muscles continue to tighten when the bladder contracts. The result is poor urine flow. Straining and pushing to get the last drop of urine out is believed to further aggravate the muscles of the pelvic floor, resulting in a vicious cycle.

  • A strong pelvic floor helps to increase or improve the sensations experienced when making love. PFD can lessen these sensations.
  • PFD can result in a prolapsed uterus, where the uterus is no longer positioned correctly and specialist intervention may be required.

There are some wonderful products now on the market to assist with pelvic floor awareness. One such product is “EPI-NO’ by Tecsana, a home training device which helps to prevent perineal injuries and incontinence. 

PREPARE YOUR NIPPLES FOR BREASTFEEDING BY GENTLY PINCHING AND ROLLING THEM

These techniques help prevent nipples becoming too sore when first breastfeeding. These methods also familiarize a woman with handling her breasts and can be performed on both sides for two minutes a day in the last four to six weeks.
A mother can prepare her nipples by not wearing a bra and exposing the nipples to the gentle friction of clothes, also by exposing the nipples to sunlight for a few minutes a day. Rubbing the nipples with wheatgerm oil or expressed colostrum (late in pregnancy) is another important preparatory step.
Don’t rub your nipples with a towel or a brush in an attempt to toughen them, as this will merely rub off skin cells and leave your nipples tender. Also avoid washing your nipples with soap as this will cause them to dry out and promote cracking when they are later stretched.

TO PREPARE NIPPLES FOR BREASTFEEDING:

Pinching: Using your thumb and forefinger, gently squeeze just behind the nipple. If your nipple does not protrude, gently pull them outward.

Rolling: Once you have pinched, roll your nipple between your thumb and forefinger, gently stretching it forward out of your breast.

If you have any questions, please get in contact with us and good luck!

What you need to do to prepare for the best birth (and beyond) Read More »

What do do if your baby is breech or posterior

What do do if your baby is breech or posterior

A BREECH BABY

Somewhere between 28 and 32 weeks, babies start to turn head first into the pelvic cavity. After 36 weeks, if your baby is still bottom first, then they will be termed ‘breech’. Some obstetricians will suggest that you prepare yourself for a caesarean and more experienced midwives are okay to deliver in breech.

Concerns for safety with a breech delivery include the possibility of compressing or prolapsing the umbilical cord, and the likelihood of the baby inhaling fluid. Other risk factors associated with breech presentation include high rate of death, neurological problems, cerebral palsy, fractures and traumatic conditions such as Erbs palsy.

WHAT CAUSES A BREECH PRESENTATION?

There seems to be a variety of contributing factors for breech presentations; a multiple pregnancy or a history of a premature delivery or breech pregnancy. Other reasons for this inverted presentation may include too little or too much amniotic fluid, an abnormally shaped uterus, growths such as a fibroids or placenta previa.

Most breech babies are born healthy. However, it is important if your caregiver has termed your baby breech that an ultrasound be arranged to assess any risks involved for mother or child. This is also pertinent if you are keen to try any activities which will encourage your baby to move into a more positive birthing position during your last few weeks of gestation.

TYPES OF BREECH PRESENTATIONS

  • Frank breech: the baby’s buttocks are aimed toward the birth canal with the legs and feet sticking straight up in front of the body.
  • Complete breech: the buttocks are down with the legs folded at the knees and the feet near the buttocks.
  • Footling breech: one or both of the baby’s feet are pointing down.

THE CHIROPRACTIC APPROACH TO BREECH BABIES AND OPTIMAL UTERUS TONE

There is no one reason as to why babies move in and out of the optimal birthing position. As the uterus is a “soft tissue”, it stretches with the growth of your baby and often in some directions more than others. The contraction of the uterine smooth muscle is known to be an involuntary action controlled and coordinated by the subconscious brain and nervous system.

Specially trained chiropractors have techniques that we utilise to turn the baby. If you would like to know more you can see the link here: LINK

ACTIVITIES FOR PARENTS TO FOCUS ON:

If an ultrasound has confirmed a breech position (and the baby appears healthy and well), bear in mind there are many different methods that may encourage your baby to turn. So before throwing in the towel along with any hopes you may have had for a vaginal birth, remember that time is on your side. Rather than feeling blue, focus on the following proactive activities:

EXERCISES:

In a breech position your baby is sitting upright in your pelvis, and ideally we wish to encourage him to tip downwards, head first. Angling your body so that your head is lower than your pelvis (so your bottom sticks up in the air) helps to create increased pressure on your baby.

This position encourages him to move crossways and then down into your pelvis, head first. It is also beneficial to Visualize your baby moving into the correct position while you perform these activities.

Knee Chest Position

Arrange yourself on all fours (i.e. on your hands and knees), then lower your upper body so that your head and shoulders rest on the floor, while your bottom remains in the air. Hold for 20 minutes, twice a day.

Breech Tilt
On the floor, in front of your sofa, gather three or four firm cushions or pillows.
Place two of these pillows, one on top of the other, against the base of the couch.
Then place a yoga mat or towel against the base of the couch, adjacent to these pillows. The mat allows for cushioning for your upper body.
The aim of this exercise is to then lie down on your yoga mat and lift your legs onto the sofa. Ensure that your bottom is touching the edge of the sofa. Then lift your pelvis into the air by pushing down with your feet and gently drag the two cushions that are next to you, in and under your legs and bottom. The cushions are meant to support your body at a 45° angle, so you may need to add an extra cushion. This task may sound difficult but with a little persistence and practice, you’ll conquer it.

Perform both of these exercises on an empty stomach, twice a day, for about 20 minutes.
  

CONSULT AN ACUPUNCTURIST, HOMEOPATH OR CHINESE HERBALIST

Combining acupuncture and dietary changes to promote an energy balance in the body can help to turn breech babies. Seck a practitioner who has skill and experience in this area. An acupuncturist will aim to realign the electromagnetic energy of the body and may use either acupuncture needles or moxibustion over consecutive sessions.

A Chinese herbalist or naturopath will be able to guide you on specific dietary changes that can promote more yang energy in your body. According to Eastern philosophies, when the body indicates too much ‘yin’ energy, your baby may also adopt this condition and breech positioning will be encouraged. “Yin’ is promoted by too many sugary, cold foods such as ice cream, chemical stimulants such as coffee and smoking, and a lack of rest. 

USING SOUND AND LIGHT

Research has shown that babies are able to hear sounds from within the uterus. Some women have had success encouraging their babies to move down towards the birth canal by using headphones playing music held low over the uterus. 

Other women use the light of a torch held over the same area to encourage their baby to move down into the pelvis towards the light source. Honestly, I would probably just shine the light source right between my legs directly onto the birth canal so as to avoid any navigational errors or fetal confusion! Take your pick

ELEPHANT WALKING

This posture is designed to encourage your baby out of a breech position. This activity involves walking around the house on your hands and feet (instead of your knees) – this is no easy task.

VISUALIZE

Spend some quiet time visualising babies in the correct fetal position.

DUCK DIVES

Jump in the pool swimming along the surface of the water. Dive and try to go vertically down towards the floor of the swimming pool. Repeat as much as you can.

A POSTERIOR BABY

A ‘posterior baby’ is positioned towards the front of the mother’s body with its spine against her spine. The ideal position for your baby pre-labor is with your baby’s chin tucked under and its spine facing to the front of the mother’s body. With a posterior position, your baby will have difficulty being able to move down and over the cervix. Dilation will be slower and the laboring mother will generally experience significant back pain and a longer labor. 

Interestingly, some posterior babies may turn or rotate into a more favorable delivery position during labor itself, particularly with active birth positions.

ACTIVITIES FOR PARENTS TO FOCUS ON:

Beyond chiropractic techniques, the following suggestions can help your baby to move into a more ideal anterior position during your pregnancy.

Specially trained chiropractors with experience in pre and post natal care have techniques to help balance the pelvis and reduce tone in the uterus.

EXERCISES

1. Crawl

Crawl around the carpeted areas of your house in 5-10 minute intervals, 2-3 times a day. You can also rest in this all-fours position and read the paper, for example.

2. Sideways Bend

While in the all fours position keep your upper body still and bring one of your hips up towards the shoulder on the same side. Start by breathing in, then a hip breathe out, tighten the muscles on your left side and draw your hip up towards your left shoulder. As you breathe in, move your hip back to the neu. tral starting position. Repeat on the other side.

3. Back Arching

While in the all-fours position, breathe in, as you breathe out, arch your back upwards and relax your head down. Keep your abdominal muscles relaxed.

Breathe in again and bring your body back to neutral.

With these activities, if you feel your baby move towards the front of your body, so for a walk to encourage the head to engage into your pelvis. 

It is recommended that once you know that your baby is correctly positioned ante-riorly (best checked by your midwife), you lie on your left side while resting, which encourages your baby to do the same.

WATCH YOUR POSTURE

Avoid sitting in reclined positions, such as leaning backward on the couch or in car seats. Research suggests that sitting upright in straight-backed chairs, straddling a chair backwards or using office kneeler chairs will encourage your baby to enter the pelvis in an anterior position.

Should you have any questions about the above, please contact us.

What do do if your baby is breech or posterior Read More »

24 Reminders for the last six to eight weeks of pregnancy

24 Reminders for the last six to eight weeks of pregnancy

The last few weeks of pregnancy are vitally important. Here are some suggestions for a mother during her final stages of pregnancy.

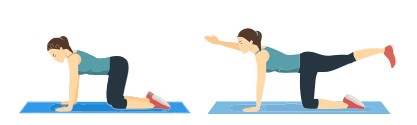
1. CRAWL ON ALL FOURS (HANDS AND KNEES) FOR FIVE TO TEN MINUTES, TWICE A DAY

This position allows optimum room for your baby to correctly place itself within your pelvis. This task is particularly beneficial if, upon abdominal examination, you find that your baby has rotated within your pelvis (into a posterior position, for example), or is yet to move down into your pelvis.

Posterior babies used to be uncommon in previous decades. It has been suggested that this is because women of these times would regularly scrub the floor on their hands and knees. This type of posture, with gravity’s assistance, encouraged babies to move anteriorly into the pelvis.

In preparation for birth we need to make a conscious effort to crawl around the house. If you feel inclined, embrace those ‘nesting urges and get down on your hands and knees and dust those neglected skirting boards and corners! Alternatively read a magazine or newspaper whilst on all fours.

2. KEEP AN UPRIGHT POSTURE

Avoid sitting in a reclined position (backward leanins) on the couch or in the ear, as these postures do not encourage correct positioning for your baby.

3. ENSURE YOUR SPINE IS ALIGNED FOR A MORE STRAIGHTFORWARD BIRTH

Due to hormonal changes and gravitational forces, pregnant women often develop specific subluxation and postural patterns. Research shows that correct alignment of the pelvis and spine contributes to a more straightforward labor with less pain and trauma for mother and child.

One particular subluxation pattern seen in pregnant women is the “Double PI Ilium/Sacral base posterior”. The pregnant mother tends to carry her head, drooping shoulders and whole upper body forward, decreasing the curve in her lower back. This results in head, neck, shoulder and back pain.

While not as commonplace as other patterns, according to Dr McCullen in her paper, Spinal Stabilization, “This type of subluxation pattern has more severe long-term consequences as the patient will be prone to protracted (long) labor, intense back pain during her labor and disordered uterine action (contractions that are inconsistent).”

Chiropractors can ensure that your spine is properly aligned and subluxation free, and regular visits while you are pregnant will diminish the chance of complications during labor.

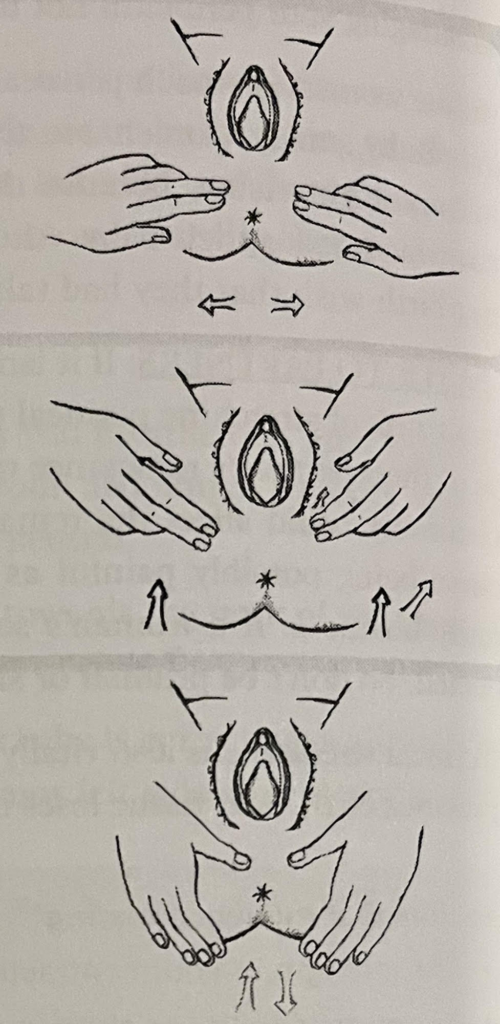
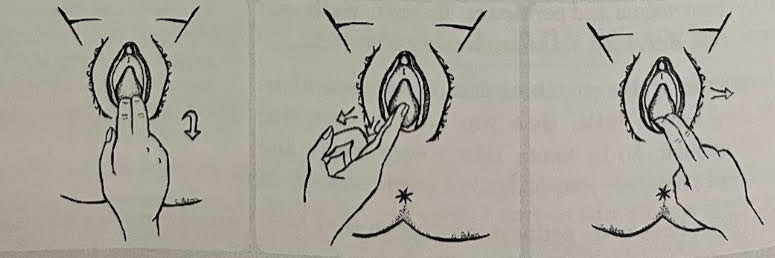
4. PERFORM REGULAR PERINEAL MASSAGE

This is important, particularly if this is your first birth, or if you have suffered perineal tears with a previous birth. This massage, while at times painful and difficult, is one of the best methods for physically preparing the body for birth. Please ask us for our handout on perineal massage should you need techniques.

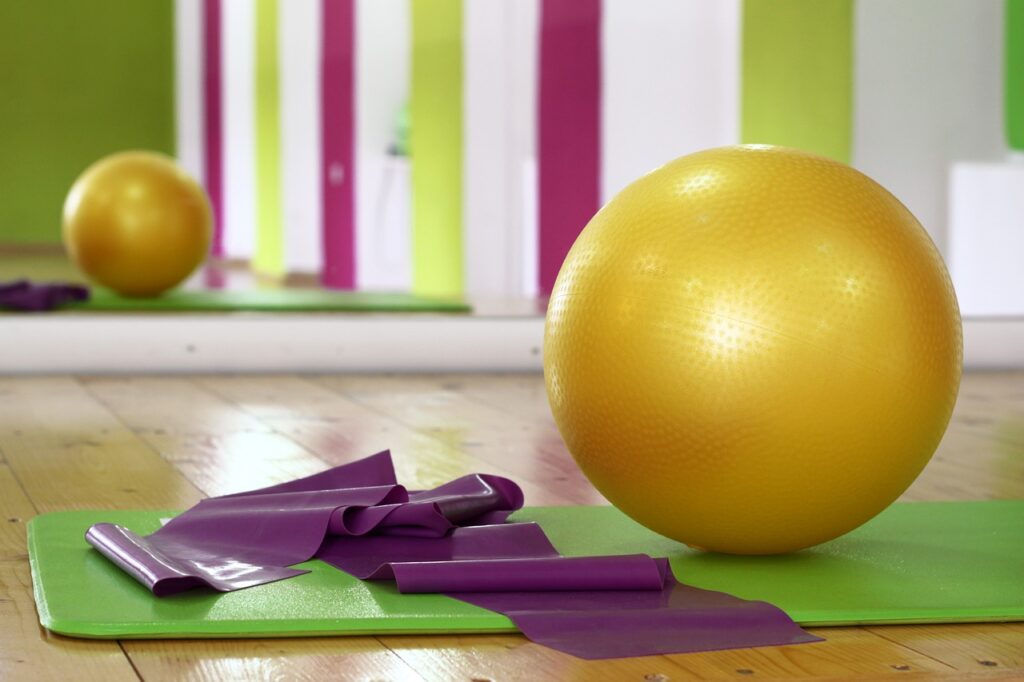
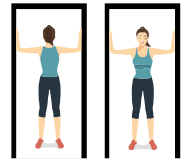
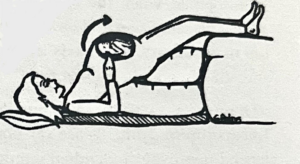
5. PERFORM PELVIC FLOOR STRENGTHENING EXERCISES

Keeping your pelvic floor strong at this late stage of pregnancy ensures quicker recovery post-birth.
A common complaint of new mothers is that no one tells them how heavy and sore their body can feel after a labor. There are few things worse than feeling as if you have to physically hold your pelvic floor as you climb a set of stairs.
So get busy with these strengthening exercises! Please ask us for our handout on pelvic floor exercises should you need techniques.

6. APPLY VITAMIN E OR JOJOBA OIL TO YOUR PERINEAL AREA DAILY

This activity helps to soften the area. If you are a new mother, your perineum has not had to stretch and accommodate for the passing of a small being before.

So help your body by encouraging elasticity. This will also be useful if you have previously experienced perineal tears.

7. APPLY OILS AND CREAMS ONTO YOUR STOMACH AND BREASTS TO HELP PREVENT STRETCH MARKS

It is beneficial to continue applying these lotions pre and post-birth, as your milk comes in and the breast tissue is further stretched.

8. BREAST MASSAGE IN THE LAST FEW WEEKS OF YOUR PREGNANCY HAS BEEN SUGGESTED BY SOME AUTHORS TO INCREASE MILK SUPPLY

With this massage you may experience some colostrum leakage; this is natural.
Knowing that you have abundant colostrum and breast milk available for your newborn instills great confidence in a new mum.

9. DRINK PLENTY OF RASPBERRY LEAF AND STINGING NETTLE TEA

These teas are available from health food stores. Use two handfuls of dre eaves and cover with boiling water in a litre jar, leave for four hours, strain and drink one cup per day. If making fresh, use three quarters of a teaspoon per cup.

Raspberry Leaf tea can be used alone or in combination with Squaw Vine, Beth Root and Blue Cohosh to help encourage a steady labor.

Stinging Nettle teas are rich in iron and vitamin K, which help to reduce the risk of hemorrhage and improve recovery post-birth. Nettles also help to reduce hemorrhoids as they are mildly astringent and strengthen blood vessel walls. Stinging Nettles are also beneficial during the first trimester.

Drink Raspberry Leaf tea regularly in the last six weeks of pregnancy as it is highly nutritious. Containing calcium, iron, folic acid and vitamin E, it prepares your body for birthing by helping to soften your cervix. Raspberry leaves consumed after labor also help milk production and hasten recovery of the uterus and pelvic area, post-birth.

10. BE PARTICULARLY MINDFUL OF YOUR DIET IN THESE LAST FEW WEEKS

In the last few weeks of pregnancy, focus on attaining enough vitamin C, B, E, K, iron, zinc and probiotics. Vegetarian mothers will also need to attain plenty of calcium and vitamin B12. Nothing beats getting these vitamins and minerals naturally from foods.

Some tips:

o  Vitamin C – attained through good quality fruits and vegetables. Vitamin C is vital for fetal development and for a mother’s increased demands of collagen for her growing breasts and stomach. Furthermore, vitamin C helps with the rate of post-labor healing, boosts your immunity and aids the body’s ability to absorb iron (sustained iron levels are vital).

o  Vitamins B – (in particular B2, B6, B9 and B12)-they may help to reduce the risk of both preeclampsia and intrauterine growth retardation.

o  Vitamin E – firstly from your diet, then in supplement form. Vitamin E is a valuable antioxidant, it protects against hemorrhoids and varicose veins, normalizes blood pressure and aids delivery.

o  Vitamin K- important for proper blood clotting and the prevention of hemorrhage.

o  Zinc – this mineral helps prevent stretch marks, perineal tearing and cracked nipples, and is important for fetal growth. Including zinc-rich foods every day in your diet may also help to prevent birth defects.

o  Iron-a pregnant mother’s diet should be rich in iron throughout her pregnancy, particularly in the last trimester. If this is your first pregnancy you may not need to take an iron supplement; with subsequent pregnancies, your blood tests may indicate lower iron levels and additional iron supplements (non-chelated) are required.

11. TRY BREATHING OUT WHEN HAVING A BOWEL MOTION

This helps a pregnant mother learn how to relax and release her pelvic floor.

12. HAVE A NAP EACH DAY

Adequate rest is important for both you and your growing baby.

“Take rest; a field that has rested gives a bountiful crop” Ovid (43BC-17AD)

13. CORRECT SLEEPING POSITION

It is recommended that once you know that your baby is correctly positioned towards the front of your uterus (best checked by your midwife), that you lie predominantly on the same side as your baby’s back to encourage him/her to stay in this same position.

As you lie on your side, place a small pillow underneath your pendulous belly (i.e. between your belly and the mattress). This helps to prevent the weight of your baby pulling your pelvis forward. Then place another smaller between four knees to assist correct alignment of your spine and pelvis.

14. VISUALIZE VS IDEAL POSITION OF YOUR BABY’S IDEAL POSITION FOR BIRTH

Visualize your baby’s position for birth:

o Head down

o With their chin tucked down onto chest

o Baby’s back to mum’s belly button

o Arms tucked down and against their body

15. PREPARE YOUR NIPPLES FOR BREASTFEEDING BY GENTLY PINCHING AND ROLLING THEM

These techniques help prevent nipples becoming too sore when first breastfeeding. These methods also familiarize a woman with handling her breasts and can be performed on both sides for two minutes a day in the last four to six weeks.

A mother can prepare her nipples by not wearing a bra and exposing the nipples to the gentle friction of clothes, also by exposing the nipples to sunlight for a few minutes a day. Rubbing the nipples with wheatgerm oil or expressed colostrum (late in pregnancy) is another important preparatory step.

Don’t rub your nipples with a towel or a brush in an attempt to toughen them, as this will merely rub off skin cells and leave your nipples tender. Also avoid washing your nipples with soap as this will cause them to dry out and promote cracking when they are later stretched.

TO PREPARE NIPPLES FOR BREASTFEEDING:

PINCHING: Using your thumb and forefinger, gently squeeze just behind the nipple. If your nipple does not protrude, gently pull them outward.
ROLLING: Once you have pinched, roll your nipple between your thumb and forefinger, gently stretching it forward out of your breast.

16. CONSIDER NOT TELLING YOUR FRIENDS AND FAMILY YOUR EXACT DUE DATE

Being vague about when you will reach your 40 weeks gestation can be very helpful, particularly if you do go over your due date. Remember that babies initiate labor when they are ready. Being discreet avoids repeated phone calls from well meaning friends and family and helps to minimize impatience for all involved.

17. MAKE A PHONE TREE

Nominate a couple of people to call after you’ve had your baby, and then have family and friends make the rest of the calls for you.

It is often best to only let a few people know when your labor starts, as this avoids unnecessary concern and tension. You can share your happy news with your family and friends once the big event is all over. This helps to prevent added stress and anxiety for everyone involved.

18. SPEND TIME WITH SOMEONE ELSE’S NEW BABY

This helps you visualize and appreciate just how beautiful and tiny your baby will be. Hold these babies, smell them and watch them feeding as this will be you soon!

19. USE MEDITATION TAPES

Quieten your mind and allow yourself time to connect with your unborn baby.

20. RESOLVE ANY ISSUES AND ACKNOWLEDGE ANY FEARS

It is beneficial for a pregnant couple to address any fears or anxieties they may have about birth. A laboring mother’s body is less likely to relax and open up during birth if she has internal conflict or if there has been a lack of communication amongst the support team.

Sit with your partner, get comfortable and take the time necessary to allow any concerns to surface. It is completely normal for couples to feel scared or nervous. It is best to be honest and to fully prepare to not judge these emotions.

Giving birth is possibly the greatest physical and emotional challenge you’ll ever face. Creating the time and space to face fears as a birthing couple (or with your birth partner if you have asked a girlfriend or your mother) can dramatically alter your birth outcome.

As a mother, some of your fears might be that there is something wrong with your baby, or that you will feel defeated by the pain of labor. You may fear that you’ll disappoint your partner in some way, or yourself.

Your partner might feel anxious about seeing you in a tremendous amount of pain, possibly for hours, or seeing you vomit or weep with exhaustion. They may be nervous about your level of health and whether you’ll be placed in any danger.

Ask your partner how they think they will respond during labor. How will they cope speaking with doctors and midwives?

Talk about these things in advance and remember the old saying that “failing to plan is a plan to fail”. Make sure everyone on your team is very clear on your birth objectives and that they are 100% supportive. If you are feeling challenged about the labor, speak to your midwife, watch positive birthing videos or read positive birthing stories. Keep focusing on ways that you can empower yourself as a birthing mother.

Take faith in knowing that women have successfully been giving birth since the beginning of time. Our bodies are designed for birth. Allowing emotions to surface and to flow without fear will enable you to fully prepare for birth and the wonderful journey of parenting.

21. ATTEND A PROACTIVE BIRTH SEMINAR

We no longer live in tribe-based cultures where young women witness and support other women birthing. Lacking the opportunity to observe natural labor without the sensationalism and hype of the media, we often misunderstand this natural process. Proactive birth seminars can fill in this gap, reminding us of the enormity of the event, and helping us to remember that birthing should be an empowering life experience.

22. TRY NOT TO EAT FISH IN THE LAST 2-3 WEEKS OF PREGNANCY

Fish prohibits prostaglandin production, which is necessary for initiating labor. Mothers ideally should limit their intake of fresh fish entirely at this point and similarly reduce their daily intake of fish oil supplements to every alternate day.

23. TAKE SUPPLEMENTARY TISSUE SALTS

These chewable tablets are safe, highly effective and easily accessible from health food stores.

Recommended tissue salts:

o Magnesium Phosphate – useful for preventing leg cramps and heartburn.

o Calcium Fluoride–aids varicose conditions.

o Silica- helps to prevent stretch marks.

o Nat Mur (or Sodium Chloride) – helps with fluid retention.

24. WALK AROUND THE HOUSE NAKED AND LOOK AT YOURSELF IN THE MIRROR

There is little room for modesty during labor. Getting used to seeing yourself naked prepares you for the likely scenario of strangers being with you in labor and seeing your naked body working to its full capacity.

Enjoy the time ahead till your little one arrives!

24 Reminders for the last six to eight weeks of pregnancy Read More »

Principles for restorative breaks

Principles for restorative breaks

Principles for restorative breaks

Image


When we think about time, it’s often that there’s not enough of it. What we often miss is that timing when we do things is a huge part of using our time well.

We tend to move through the day in three stages – a peak, a trough, and a recovery. And most of us move through it in that order. Those of us who are strong night owls go in reverse order. You also see a pattern of mood that follows the same sort of trajectory where we have an elevated mood in the morning. It drops in the early afternoon and then rises again late in the day. In the mornings, during the peak, most of us excel at heads-down focus: analytic work that requires sharpness and vigilance. The trough is good for routine administrative work. Later in the day, during the recovery, most of us do better on insight and creative work that requires less inhibition and resolve. A better mood with less inhibition can lead to great ideas.

Using the time of day to your advantage can lead to much better decision-making and fewer errors.

Another way to use timing is with breaks. The common view seems to be that amateurs take breaks; professionals don’t. And it’s the exact opposite. Professionals take breaks, amateurs don’t. Breaks are part of the performance.

Breaks can be as simple as standing up, shaking your arms and legs, flexing your muscles and rotating your core before sitting back down. You can also follow the 20-20-20 rule: for every 20 minutes spent on a task, spend 20 seconds looking at something 20 feet (6 meters) away.

Some guiding principles for restorative breaks:

  • Doing something is better than doing nothing. High performers work for fifty-two minutes and then break for seventeen minutes. Other research has shown that breaks scattered throughout strenuous tasks decrease fatigue and increased productivity.
  • Moving your body is better than being stationary. Hourly five-minute walking breaks can boost energy levels, sharpen focus, improve mood throughout the day and reduce feelings of fatigue in the late afternoon.
  • Being social is extremely important. Talking with coworkers about something other than work is effective at reducing stress and improving mood. We are wired to connect and be in a group. Lack of connection can lead to a multitude of mental health problems.
  • Outside is much better than inside. When the sun comes out, try to get a walk in with some fresh air. Listen to a podcast or your university class or take a meeting whilst walking outside.
  • Fully detached is better than semi-detached. Tech-free breaks reduce emotional exhaustion. Turn off your phone for a period of the day.

Some other time-specific activities:

  • Coffee: Avoid coffee immediately after you wake up, rather wait 90-120 minutes after waking for your first cup. It’s also a good idea to have your last hit of caffeine no later than 8 hours before you plan on going to sleep to minimize the effects of the stimulant on your sleep quality. Avoid drinking coffee near to eating as coffee reduces the amount of nutrients you can absorb from your food, so delay coffee for at least 1 hour after eating.
  • Sleep and wake time: It’s important to have a fixed bedtime and waking time. The body has a built-in circadian rhythm that functions best with routine.
  • Hormone levels: Many of our hormones oscillate through the day and night. Cortisol, for example, should be highest in the morning and lowest in the evening. The timing of hormones is important as a break in this cycle affects many of the systems in your body.
  • Timing of meals: intermittent fasting, where you cycle between periods of eating and fasting, may benefit heart health, reduce inflammation, and improve cell repair processes. Note: intermittent fasting is not for everyone. The evidence is based mostly on males, therefore for females we can still time our eating patterns, but it’s important not to have big swings in blood sugar levels. It’s also important to time your biggest meal of the day around your sleep schedule – so avoid a large or starchy meal at night as this can reduce sleep quality.
  • Sunlight: It’s important to expose your eyes to indirect sunlight so your brain knows that it’s daytime and releases the appropriate hormones for the day, the best time is in the morning. On sunny days, don’t feel that you always have to wear your sunglasses when it’s sunny. Sunlight helps a myriad of bodily processes such as setting your sleep-wake cycles. This works in reverse for nighttime. When it gets time to sleep, it is time to reduce light. This signals your brain to increase sleep hormones.

Principles for restorative breaks Read More »